A website can seem like quite a daunting undertaking for any archaeology project… after all, there’s coding, graphic design, email servers, hosting and often expensive fees associated with it.
Many archaeology projects often try to use a free solution such as weebly, 123reg builder, Wordpress (WP Hosted basic version) or WIX, but the results are generally cringe-worthy as these solutions lack any real control or flexibility to make something your own. These solutions also have bolt on fees attached to add additonal functionality, but that’s not to say these arn’t the right solution for you.
Another option is a web developer, but this generally comes at a large cost with the average basic website being £1500 upwards along with service level agreements or SLA contracts. (Unless you’re one of those people who has a mate who dabbles in web who can do it for free!).
Alternatively, you may be able to source a cheap developer through freelancer websites such as peopleperhour.com – Average site tenders range from around £250-£1000 for a developer, but be sure to check their ratings, past reviews and any samples in a portfolio of sites they’ve constructed. The main issue you’ll find with this option, is that these developers will prefer you to use a generic prebuilt template they’ve worked with and communication to project manage a build, could be difficult if they are some distance away.
This guide, will teach you how to setup a website for your project all by yourself – A premium solution for around £100 that includes a domain, server, hosting, mail server for your emails, a content management system and a live template. All my websites excluding my shopify stores have been setup exactly this way, as have many partner websites i’ve built over the years for clients across all industries.
Step 1 – Domain
Think of a domain, try not to be so long winded in the name, where possible abbreviate your organisation – You will generally want a .com where available but these are becoming quite rare in the bustle of domain brokering and domain squatters – so for a UK project maybe consider a .co.uk or .org. or a URL relevant to your country or territory.
I generally use https://www.123-reg.co.uk to search for available domains as their system is pretty fast – but, as per registering it with them i’d stick with an alternate solution. (Discussed below)
Step 2 – Host
Once you’ve found an available domain, we are going to want to sort out a hosting solution where your website will live and be managed from. I’ve gone through most suppliers out there, from 123-reg, godaddy, 1AND1, easyspace and fasthost – My advice…. Avoid! It takes 24 hours to get a response on any support tickets and all have been prone to service issues which is why i’ve terminated their services for all my clients.
You really want a hosting solution that is easy to use, comes with immediate customer support and is still quite reasonable in costings. All my sites, including HeritageDaily are managed and hosted on Siteground.com. (I’m getting no commission for suggesting them, their service has been exceptional over the years which is why i’m happy to recommend them to colleagues).
As a new website you’ll only need the “startup” solution (https://www.siteground.co.uk/web-hosting.htm) – Click the get started button and register your domain – you now need to make payment that will cover your project hosting, mail server and domain for 12 months.
Step 3 – Content Management System
We now need to setup the infrastructure for your site – this will be a content management system such as Wordpress, joomla or drupal. For ease of use, i’d suggest Wordpress as it’s quite versatile and straight forward in the navigation layout.
In order to install Wordpress, we need to “unpack” onto your server.
Click on “My Accounts”

Click on “Manage Account”

Click on “Go to CPANEL”

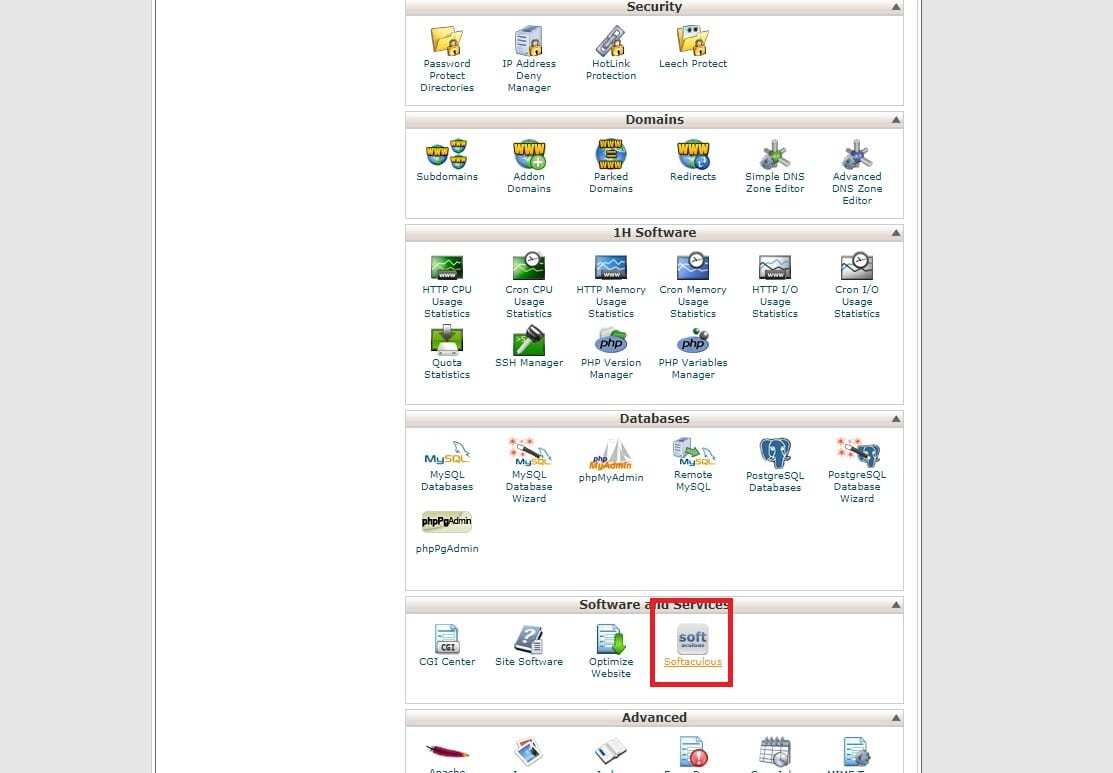
You’ll be led into a portal that looks alittle like an outdated version of windows – this is the Cpanel interface that is used to manage all aspects of your website under-the-hood. Have a play when you get a moment to familiarise yourself with the icons and what additional features they can offer you.
For now however, scroll down the page until you see an icon called Softalicious – Click on it.

Normally I install a CMS manually, but this function will allow you to unpack Wordpress onto a server with just a few clicks. Search for Wordpress in the search bar or click on “Blogs” to find the installer app and click install.

You now need to set the location for unpacking – in the dropdown for protocol select how you want your URL to appear – i.e. www.domain or just .domain If your site has SSL, then please choose the HTTPS protocol. Presently you’d probably want www.domain but in the future an SSL url is suggested to let people know your site is secure (speak to Siteground customer services who can help you to set that up later)

Choose Domain – this should be where your site is to be installed – so make sure the field has your chosen domain URL in it. Finally the directory – this is only really for a subdomain installation so I suggest you leave this blank.

Site Name – Enter the name of your organisation
Site Description – A sentence about your organisation. ie. “The Norwich Archaeological Trust is the primary excavation unit in the Norfork area”

Now enter the usename, password and admin email you wish to use for your login details for Wordpress. (Don’t use “Password123” etc for your password – make it at least a challenge for hackers!)
Finally, click that “Install” button – Softilicious will do the complicated task of creating your databases, file directories and unpack Wordpress onto your server without any server configuration required on your part…. Magic!
Once the installation has finished, you can access your content management system by either typing www.yourdomainname.com/admin or www.yourdomainname.com/wp-admin then enter your login details you created above.

Welcome to Wordpress!

Step 4 – Template
Its time to go clothes shopping as your website needs dressing up! The best location for templates on the web is www.themeforest.com

Each template is unique and may configure your wordpress setup differently once installed. You really want a template that uses a drop and drag system like Visual Composer (Means you can configure or change your site layout without the need to edit code). Example templates with this feature can be found here (https://themeforest.net/search?term=visual%20composer)
Once you’ve purchased a theme you like, you need to download the relevant files by clicking on your profile name, downloads, download, then “installable wordpress files only” – The “All files and documentation” will contain further information you’ll need so download as well. (This contains supporting documentation and help documents for your template should you struggle using it once installed)

Once downloaded, go back to your wordpress content management system and in the left hand column select “Appearance” and then “Themes”
You’ll be shown a page (themes dashboard) where all your themes are managed from, you can install multiple ones and switch at a whim. To install your theme click on “add” then “upload theme” then “choose file” and select the theme you downloaded onto your device.
Wordpress will do the rest in unpacking and installing onto your server. Once installation is complete, click on “activate” under the theme in the theme dashboard.
Congratulations – You’ve now setup a domain, server and installed a template. To configure your site and edit, please refer to the support document that would have come in the “all files and documentation” zip file you also downloaded. All wordpress installations are different, so unfortunatelly I can’t really advise on this point.
By selecting a theme with Visual Composer and a WP CMS – It should be relatively easy for you to update and configure your site. Just encase – Guides for using Visual Composer – Guide for Using Wordpress
Step 5 – Setting up your Emails
Repeat the process above of accessing your CPANEL – In the interface of icons select the one called emails – Then on the following screen, create the relevant emails you wish to use for your organisation and allocate the storage capacity.

Finally, you need to get the connection settings required to connect your device, outlook etc to the email – All these settings can be accessed by clicking on “More” to the right of the relevant email, then click on “Configure Email Client” – The following page will contain all the POP, IMAP, MX credentials etc you’ll need.

If you struggle or need help, you can email me at [email protected] (Please note, this free support is only open to archaeology groups, outreach projects and community projects)
Written by Markus Milligan
Header Image – CC – Public Domain


